This video is at a viewers request on how to properly clean the Berreta Cx4 Storm Carbine. As always, click the READ MORE below to view the article. The Video component is located at the bottom of the article.
Beretta Storm Cleaning
by Jessie Indracusin
INTRODUCTION
I received a viewer email last week asking how to clean the Beretta Storm. Please keep in mind that this is not specifically done the way Beretta may mention, but this is how I have cleaned it from day one without any issues. As far as the frequency of cleaning this firearms, it is not required that often. It is a well designed gun and if you shoot it frequently (once a month), I wouldn't even bother cleaning the gun after each cleaning. I would probably clean it about once every third time I shoot it. Please note, for a specific breakdown on cleaning products, please refer to the gun cleaning video/article.
BREAKDOWN SIMPLICITY
The breakdown of the gun is VERY simple. Unlike a lot of guns, the breakdown tabs, button, latches, etc. that you sometimes need to 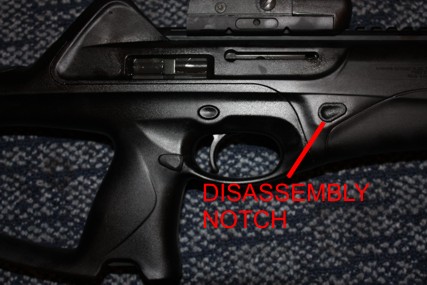 strong arm to release are not a problem with the Beretta Storm. As seen in the photo, the disassemble latch (even though it is more of a button if you ask me) can be pushed out very easily by any little dainty woman even. You push this latch all the way through the gun so it pops out on the other side. Of course, like always, ensure the magazine is out of the gun and there are no bullets in the chamber.
After you pull that out, pull the two halfs of the gun apart. Take the upper receiver and tilt the barrel up to the ceiling. The Bolt assembly will slide down and stop. At this point, pull the charging handle out of the side and catch the falling bolt assembly. My first impressions of the bolt assembly on the Beretta is that the beauty of it's design make it a bit unique. It seems like every gun seems to pretty much be a copy of the old Stoner designed M16/AR15 design or AK or FAL or H&K. Beyond that, there is not much innovations in designs. This can also be a good thing since the US Government has spent millions having some drill seargant delicately imparting his knowledge to you like THIS . God I always laugh my ass off everytime I hear those clips from Full Metal Jacket. Anyways, after you pull out the bolt assembly and you have it laying on a cleaning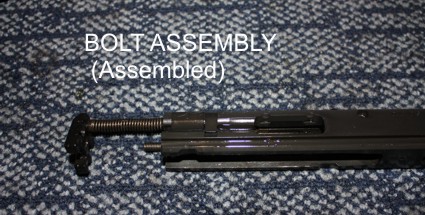 mat (or your ex-wife's favorite dress), you can start doing some minimal bolt assembly breakdown. Keep in mind what I am covering here is a quick, after shooting cleaning. I am not covering a complete breakdown of the bolt assembly since it is not really needed.
CLEANING
The bolt will have all of your black gunk that you are trying to clean off. I tend to only break it down very minimally for cleaning. The main parts that I clean, I use the Number 9 solvent over the entire assembly. The same solvent I also use to clean the inner parts of the upper and lower receiver to get all of the powder out of the gun. This is a fairly easy thing to accomplish. You will either use a cleaning rod or a "snake" to clean the barrel out. I use the same Number 9 Solvent for that too. I use the Remington Gun Oil spray to shoot down the bore to clean it or you can use a bottled gun oil with the little fishing tool to run it up and down the barrel. This is actually a better way of cleaning it, but since I ended up cleaning this gun three times for the video (I had difficulties trying to get the whole thing under 10 minutes) I used the spray.
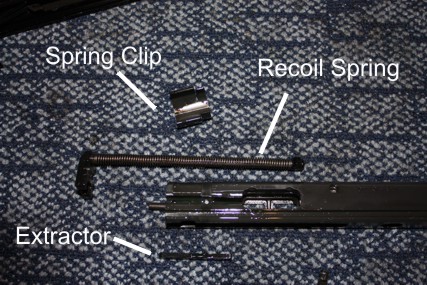 At this point, you will want to take the bolt assembly apart. I should refer to this as minimal bolt disassembly. Yes, you can strip the bolt down more than I have, but it is not something you need to do after every shoot. If you look at the photo of the bolt disassembled, you can see the various parts that I break down, mainly to the spring clip, recoil spring, ejector and the bolt itself. Beyond this simple breakdown, I wouldn't go and further than this. Clean all parts with the Number 9 solvent and use the Remington gun oil to spray the recoil spring down with. You will use the liquid gun oil to run a beaded line along the spring. At this point you can spray the whole bolt assembly down with the remington gun oil for good measure. I like to run one beaded line down each side along the assemble channel (the part that has the long groove along the right and left of the bolt assembly.
FINISHING TOUCHES
At this point you use an exterior finisher to clean all the exterior plastic parts of the gun. Most of these are a form of an alcohol base and are great at removing gun powder. I would pay special attention to cleaning the plastic around the front of the barrel and along both sides of the gun near the ejector port and on this gun the opposite side that is the bullet indicator/round chambered indicator.